Sunday, October 30, 2022

Stampin' Up! Forever Fern Sending a Little Message

Color Throwdown Challenge #716.


Love this color combo!

I chose the Stampin' Up! Forever Fern stamp set along with Bottled Happiness stamp set for the sentiment.

The Stampin' Up! colors I used: Soft Succulent, Petal Pink and Highland Heather.

The card base is Basic White cardstock.  Using all three of the colors from the palette, I created thin strips to add along the top portion of the card.

I really love how the envelope flap turned out!  Simply using all three colors of ink pads and the Forever Fern stamp set.

Soft Succulent Satin Shimmer Ribbon was wrapped around the card and adhered in place on the back.  I felt like the ribbon needed something, so I cut a small piece of the same ribbon and trimmed off the seams on each side.  Using my snips, I began pulling apart the fibers on each side, leaving a thin strip in the center.  Next, I wrapped it around the ribbon and tied it in a knot, snipping off close to the knot and hiding it under the ribbon.  A single pearl was added in the center.

The image was stamped on Petal Pink cardstock using Soft Succulent ink.  Then I began stamping the images all around the sentiment.  I finished off my card by adding Festive Pearls randomly.
The dotted stamp was used on the background cardstock strips as well.
The layered die cuts were cut using Stylish Shapes Dies and adhered with dimensionals.

Because I loved how the envelope flap turned out, I decided to do the same inside the card.  Soft Succulent cardstock was layered with Basic White cardstock.  The dots were added after stamping the other images.


Thanks so much for stopping by today.

Subscribe to my blog to receive an email notification with each new post.

Follow me on PinterestInstagram and my Facebook Business Page.


Saturday, October 29, 2022

Stampin' Up! All Bundled Up Bird Card


I used the Stampin' Up! All Bundled Up stamp set along with Storybook Gnomes DSP to create my card with a cute little bird.

For my card base I used Night of Navy cardstock with the next layer Storybook Gnomes DSP.

The sentiment was stamped using Pacific Point ink.  The embellishments are Fine Sparkle Gems which are so pretty.

The die cut behind the bird is from All That Dies.  The snowflakes were stamped using Pool Party ink.  The trees were fussy cut from the DSP and the cute little bird was colored using Sweet Sorbet and Balmy Blue Stampin' Blends, fussy cut and adhered with a dimensional.


Inside the card is DSP layered with Basic White cardstock with the snowflakes stamped in two corners.


Thanks so much for stopping by today!

Please subscribe to my blog to receive an email with each new post.

Follow me on PinterestInstagram and my Facebook Business Page.


Friday, October 28, 2022

Stampin' Up! Cottage Wreaths & Jingle, Jingle, Jingle Card


I decided to only use the sketch for this challenge as I'm finished making Halloween cards and now focusing on Christmas cards.  Yay!

The stamp sets I used are Stampin' Up! Cottage Wreaths bundle along with Jingle, Jingle, Jingle stamp set.

For my card base I used Cherry Cobbler cardstock and again, the "bubble burst" technique for my background, which I thought went perfectly with my card.

The wreath was stamped using Garden Green ink and the berries stamped using Cherry Cobbler ink.
The beautiful gold bows were die cut using Brushed Metallic cardstock.  The centers of each bow has sequins.

The stamp sentiment is long, so I stamped the image using Cherry Cobbler ink and snipped it into three pieces and used the Brushed Metallic as a mat and adhered onto the wreath.

Using a thin strip of Brushed Metallic cardstock, one end was cut at an angle.

The sentiment stamp is actually all one stamp.  I colored the letters using Shaded Spruce and Cherry Cobbler Stampin' Blends markers, coloring the darker shade along the bottom of each letter and using the lighter shade for the top of each letter.  The letters were then fussy cut and adhered onto the gold strip and then adhered using dimensionals.

The front of the envelope as well as the envelope flap was stamped with a wreath with berries.

For inside my card, I wasn't quite sure of the sentiment yet, so I stamped off with the wreath image and then stamped in the center of the Basic White cardstock.


Thanks so much for stopping by today.

For details on the "bubble burst" technique I used on this card background, I also used the same technique on the previous post, where I detail how this technique.


Please subscribe to my blog to receive an email with each new post.

Follow me on PinterestInstagram and my Facebook Business Page.


Stampin' Up! Merriest Moments Card & "Bubble Burst" Technique


I guess it's safe to say that I'm in full swing with Christmas card making now.  And it's really hard to make Fall cards when I have Christmas cards on my brain... including which designs to create for mailing out mine own stack of cards by December 1st!

For this sketch, I chose to use the Stampin' Up! Merriest Moments and Christmas Banners bundles along with my own background creation using the "bubble burst" technique.

I began with the card base in Evening Evergreen cardstock.  The white strips are Stampin' Up! White Glimmer Paper.

The flowers were stamped using Real Red ink and the leaves in Garden Green ink.
The leaves are from the Christmas Banners bundle and die cut using Brushed Metallic cardstock and tucked under the leaves so only a portion of the stem of leaves stuck out.

The background was dotted using Garden Green ink before adhering the flowers and leaves.
The sentiment was stamped using Real Red and die cut using my favorite set of dies - Stylish Shapes Dies and adhered with dimensionals.  The embellishments are the red Festive Pearls.

This fun background was created by using 8-10 drops of Garden Green re-inker, a few drops of dish soap and water.  Mix it up and grab a straw... and blow bubbles!  That's right, blow bubbles (please be sure not to drink from the straw) until the bubbles rise up enough so you can gently dab your Basic White cardstock onto the bubbles.  The design is different each time.
If it isn't dark enough, add more re-inker.  And you can keep blowing bubbles until you get the desired effect.
While you have everything out for this technique, why not make several more to use for other projects?

Let me know if you give this a try and how you like it.

Inside the card is a thin strip of the bubble burst cardstock adhered onto Basic White cardstock and another single flower.

The envelope flap was stamped using the same flower as well.


Thanks so much for stopping by today.

I hope you will give the "bubble burst" technique a try.


Don't forget to subscribe to my blog and receive an email notification of each new post.

Follow me on PinterestInstagram and my Facebook Business Page.


Sunday, October 23, 2022

Stampin' Up! Forever Fern Hello Card


For this fun sketch I used the Stampin' Up! Forever Fern stamp set along with Celebrate Everything DSP.
I tried to keep it as clean and fresh-lined as I could.

My card base is Basic White cardstock with a layer of Stampin' Up! Celebrate Everything DSP which was adhered with dimensionals.

Using the Stylish Shapes Dies, the squares were die cut from Basic White cardstock.  The sentiment was also cut from the same dies set.

The sentiment was stamped using Pacific Point ink onto the banner and adhered with dimensionals.  A single Iridescent Pearl was added to the right of the banner.
Linen Thread was wrapped around the card twice and tied in a bow.

Using Pool Party & Pacific Point inks, I stamped the images from the the Stampin' Up! Forever Fern stamp set.  Each square was adhered with dimensionals.

DSP was added on the envelope flap as well.

Inside my card is DSP layered with Basic White cardstock.  I also added some stamping of the images in the lower and upper corner.


Thanks so much for stopping by today.


Follow me on PinterestInstagram and my Facebook Business Page.


Saturday, October 22, 2022

Stampin' Up! Halloween Card in Pinks


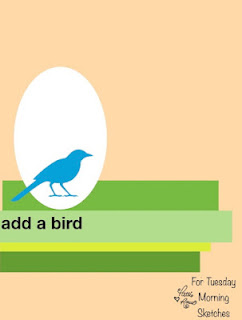
From the list above, I used three plus 1 to create my card: Pumpkin, Stars, Black, Trick/Treat.

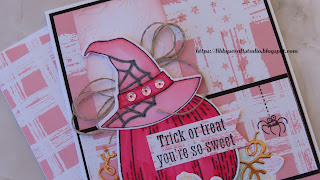
I chose the Stampin' Up! Hello Harvest bundle along with Gingham Cottage DSP, Bewitching stamp set & Witch Hat Builder Punch to make a unique card in pinks.

I kept the card base Basic White cardstock as there is lots of pink going on.
Basic Black was used as the next layer and finally Stampin' Up! Gingham Cottage DSP.

The white cardstock strip was embossed using the Leaf Fall 3D Embossing Folder and using a blending brush and Blushing Bride ink, shaded all along the edges before adhering onto the card.

The next strip that goes across the card is Basic Black cardstock with the same DSP.

The spider was stamped with Memento ink as well as the pumpkin and hat.
The sentiment is from the Scary Cute stamp set and stamped with Memento ink onto DSP and adhered directly onto the pumpkin.

The leaves were colored using sponge daubers and So Saffron, Pool Party and Blushing Bride inks, die cut and two were tucked under the pumpkin and one adhered onto the pumpkin, overhanging.

The curly dies were die cut from Copper Foil sheets and tucked slightly behind the pumpkin.

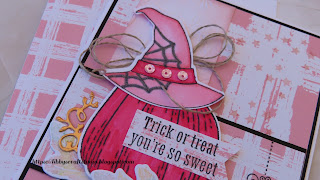
The pumpkin and hat were colored using Polished Pink, Flirty Flamingo, Sweet Sorbet, Basic Black and Melon Mambo Stampin' Blends markers.

The web on the hat was traced with Basic Black Stampin' Blends and drawn over again with Wink of Stella.  The band across the hat was also colored with Wink of Stella to add some sparkle.  I also added Wink of Stella on the spider web.  It was hard to capture the sparkle, but it's there.

Three sequins were added on the hat band and Linen Thread looped several times and adhered behind the hat.  After adhering the hat onto the pumpkin, it was adhered with dimensionals.

I tried to capture some of the sparkle, but sadly, it doesn't really show.
Wink of Stella was also added on each of the stamped stars on the right of the card.

Inside the card is lots of layers, starting with DSP, Basic Black and finally Basic White cardstock.

The stars were stamped in the upper corner and one single leaf which was sponged, added in the lower corner.  And, I had to add more Wink of Stella on each of the stamped stars inside the card as well.

DSP was also added on the envelope flap.


Thanks so much for stopping by my blog today and I hope you enjoyed my "all in pinks" Fall/Halloween card.

Happy crafting,


Follow me on PinterestInstagram and my Facebook Business Page.


Stampin' Up! Forever Fern Card


Love the colors for this weeks' challenge!  
From the Stampin' Up! colors I used Pumpkin Pie, Old Olive and Basic White.

I chose the Stampin' Up! Forever Fern stamp set along with All That Dies, Delicate Edges Dies and the Painted Texture 3D Embossing Folder to create my card.

Basic White cardstock was used for my card base with another layer of Basic White which was adhered with dimensionals.

I also added stamping on the envelope flap and really love how this turned out!

For the background images I used the Forever Fern stamp set, which is quickly becoming my go-to stamp set if I want a card using a variety of leaves.

Masking Paper was adhered at an angle over the Basic White cardstock, using as thin or wide as a strip that you would like.
Then I began stamping, using only Pumpkin Pie and Old Olive inks.  The dotted image was added last.

I started by using strips of cardstock in Pumpkin Pie and Old Olive in 1/4 inch strips.  

I adhered them onto basic printer paper and then embossed it using the Stampin' Up! Painted Texture 3D Embossing Folder.  I added it onto the basic white at an angle.  Because the strips were really too vibrant, I needed to add something more.  After going through all my dies, I used the Delicate Edges Dies, die cutting on white cardstock and added along each edge of the paper strips.

The sentiment is from the Cottage Rose stamp set, stamped with Pumpkin Pie ink and die cut using the All That Dies and finally, adhered with dimensionals.
Pearl Basic Jewels finish off the card, adding them around the sentiment.

The ribbon is Old Olive Twill Ribbon which I cut in half before tying in a bow and adhered below the sentiment.  I love the fraying of the ribbon, which gives it a unique look.

I loved this combination of color so much, I also added lots of stamping on the inside of my card as well!


Thanks so much for stopping by my blog today!

Happy crafting!


Follow me on PinterestInstagram and my Facebook Business Page.