Sunday, July 31, 2022

Happy Forest Friends Card

 I created this cute card for Paper Craft Crew Challenge #480.  I was drawn to the sketch and knew exactly which stamp set I would use... Happier Than Happy Stamps & Dies, along with Happy Forest Friends DSP.
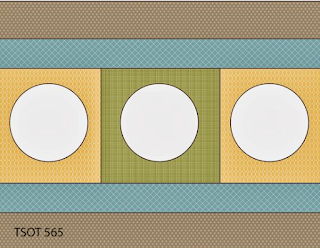
This is the sketch:


And here's my card:

I used Calypso Coral for the card base, then layered with Basic Gray cardstock, which was embossed using the Fern 3D embossing folder.

Old Olive ribbon was looped at the top of the large banner with a tiny peek at the bottom, cut at the same angle as the banner.

The cute bear image was stamped with Basic Gray ink on Basic White and adhered with dimensionals.  A tree was die cut and tucked behind the bear and sentiment.  Several mushrooms were cut from the DSP and adhered with liquid adhesive, except for the smallest mushroom, which was adhered with a small dimensional.

The sentiment was stamped with Memento ink on Calypso Coral.  I wrapped one end of the banner around my scoring tool to create a "tunnel" and adhered on the back, so I could insert Linen Thread through it and tie in a bow.

Leaves were die cut with various cardstock colors and adhered randomly on the card.

I stamped a portion of the bear on the front of the envelope.

For inside the card, I added Basic Gray and a die cut tree.

Thanks so much for stopping by today and I hope you enjoyed my card.


Subscribe to my Blog and receive notifications each time I post a new project (on the right of my blog, scroll down until you see "Subscribe..." and add your email address.  Easy peasy!


Subscribe to Paper Pumpkin.  You won't want to miss out on the August kit!
See all the info below.

There are TWO ways to subscribe:

OR


Join my team and become a demonstrator!
You only have until August 31st to receive this awesome FREE gift along with your $99 Starter Kit (see below).

This FREE planner is only available until August 31st when you Join.  You will receive the beautiful Planner, lots of insides for your planner, notebooks and a stamp set.


Have you checked out the Stampin' Up! Kits Collection?
There's a NEW kit available... "The Best Remedy Kit"

View ALL the Kits available here.


Products used for today's card:


Friday, July 29, 2022

CAS Colours & Sketches #480 Friend Card

The card I'm sharing today is a "clean and simple" card for the CAS Colours & Sketches Challenge #480.

I got out Blending Brushes and Sponge Daubers and had some fun, while hopefully keeping the card simple enough.


This is what I created:
I started by creating the long rectangle using Masking Paper from Stampin' Up! and adhered this to the card.  With Blending Brushes and Night of Navy ink, I started very dark on the left and slowly worked my way to the right, keeping the shading lighter by the time I reached the point.  When I finished, I simply and carefully peeled off the masking paper.

Next, I embossed the card and using the Daubers, ever so lightly, went along the edges of the embossed cardstock.

In these next photos you can see how I started blending darker and gradually went lighter.
The flowers were cut from Hues of Happiness DSP using Blossoming Happiness Dies.

The pink flower was adhered directly onto the card and the larger flower and leaves were adhered with dimensionals.

The sentiment was stamped in Night of Navy ink using Happiness Abounds stamps and fussy cut around it then used Sponge Daubers to go around the edges so it stood out more.
I finished off the card by coloring the Pearl Basic Jewels using Night of Navy Dark Stampin' Blends before adding them onto the card.

For the inside of the card I stamped the image in Night of Navy and adhered with liquid adhesive.

I hope you enjoyed my card for today!

Thanks so much for stopping by!


Join my team and become a demonstrator.


Subscribe to Paper Pumpkin.  The August kit is going to be SO fun!

Several ways to subscribe:
OR
Prepaid subscriptions (see the chart below)


There's a new Kit in town from the Stampin' Up! Kits Collection!


Products used for today's card:


Wednesday, July 27, 2022

Global Design Project #353 Birthday Card

How about a Color Challenge?

The challenge this week at Global Design Project #353 is a Color Challenge.
Are you in?


Such pretty colors!  I haven't used Blackberry Bliss very much, so this was my opportunity to pull out some pretty color combos.

Here's my card:
I chose Blackberry Bliss as my card base then layered Bermuda Bay, which was embossed using the Painted Texture 3D embossing folder.  Using my water painters and Blackberry Bliss ink, splattered some ink onto the embossed cardstock.

For inside the card, I stamped a portion of the Daisy Stamp along the bottom using Bermuda Bay on Soft Sea Foam cardstock.

Soft Sea Foam and Bermuda Bay Stampin' Blends were used to color the daisies and leaves, from the Daisy Garden Stamp.  Soft Sea Foam ribbon was wrapped around the card and tied in a bow and the sentiment was adhered with dimensionals.

Thanks so much for stopping by today and I hope my card inspired you in some way.


Products used for today's card:


Tuesday, July 26, 2022

Try Stampin' On Tuesday Sketch #565

 By now, you know how much I love sketch challenges.

This looked like a fun sketch at Try Stampin' On Tuesday (#565), so I decided to play along.


Here's what I created using the Happy Forest Friends DSP from Stampin' Up!

Had so much fun with this card!  Lots of fussy cutting involved, but well worth it, because I love the end results.

The card base is Calypso Coral cardstock 4 1/4 x 11, scored at 5 1/2.
The next layer of DSP 4 x 5 1/4
The Smoky Slate cardstock 5 1/4 x 3
DSP strip layer 5 1/4 x 2

The cute owl was stamped on the envelope using Smoky Slate ink.

I think the hardest part was choosing which size circles to use and arranging them onto the DSP in the correct places.  The DSP strip was adhered with dimensionals to the cute little animals inside would be raised up off the cardstock.
Linen Thread was wrapped around the card twice and tied in a knot.

The animals and leaves were all cut from the beautiful Happy Forest Friends DSP.
The animals were adhered inside the circles with mini dimensionals and also liquid adhesive to adhere them to the inside of the circles.

The leaves were tucked under the cardstock except for the middle leave which was just adhered on top of the cardstock.

The Calypso Coral and Smoky Slate cardstock were embossed with the Fern 3D Embossing Folder.
The embellishments are Rustic Metallic Dots.

The sentiment was stamped with Smoky Slate ink on Calypso Coral and adhered with dimensionals.

And lets not forget the two tiny birds that were also fussy cut from the DSP.  They were adhered with mini dimensionals.

For inside the card, the first layer is DSP measuring 5 1/4 x 4 with Basic White o top at 3 3/4 x 5.  I fussy cut another fox and leaf to adhere inside also.

Thanks for stopping by today and I hope you enjoyed my card.


Subscribe to Paper Pumpkin and receive a cute little box each month filled with everything you need to create beautiful cards or alternate projects.


Shop the Stampin' Up! Kits Collection.  There's a NEW kit in town and it's super cute!


Join my team and become a demonstrator.  Now is the perfect time to join!  You only have 6 more days to sign up to choose your Starter Kit and also receive this beautiful Planner FREE!


Products used for today's card:


Monday, July 25, 2022

Sketch Challenge at Paper Players #601 & TP Technique

It's time for another challenge at The Paper Players!

Here's the sketch for this week:


I couldn't wait to use the TP technique for this card!  And added a twist by "coloring" the TP!
How cool is that?

This is my card:
I chose Basic Black cardstock for my card base and used Rustic Harvest DSP.
This beautiful leaf is from Soft Seedlings stamp set from Stampin' Up!
The TP was embossed using the Twigs & Sprigs Embossing Folder.

The leaf was stamped with Daffodil Delight ink on the envelope front as well as the flap.

To stamp the leaf image, I used blending brushes and ink pads to color directly onto the stamp, mixing them up in the process, to create a unique color.

The sentiment was stamped with Versamark and heat embossed using White Embossing Powder.  I fussy cut around the sentiment before adhering with dimensionals.

Now for the TP technique!  First, I have to tell you where I got this awesome technique from.  I registered for the Creativate Summer 2022 Retreat this past weekend.  This is a team of four awesome Stampin' Up! members who hold these retreats four times each year.  The techniques and fun folds are amazing!  Look them up and when registration opens up in September for the October Retreat, you have to sign up!

Ok, so, first of all, protect your surface area and lay down a paper towel.  Get out your TP.  Tear off two squares and lay it on the paper towel.  Add another strip.  Then mist with water.  Mist it enough so that it's wet, but not dripping.  Add another layer of TP, mist it, then add the final fourth layer of TP and mist that as well.
Lay the TP onto the embossing folder of your choice.  Fold a paper towel in half and lay it on top of the TP.  This helps to soak up the excess water.
Run it through your emboss machine, open up your folder and peel off the paper towel.  Here's your embossed TP!  Trim off the excess that didn't get embossed.
Lay it flat to dry completely.
While you're at it, make a bunch of these, using various embossing folders, let them dry and you will be ready for your next project!

But, I went one step further.  I wasn't sure how this would work, but I really wanted to add some sort of color to my embossed TP.

I used one of the Decorative Masks and got out my blending brushes and started "coloring" the TP!
I love how it turned out!

The leaf was stamped on the inside of the card on Basic White cardstock.  I did add a layer of DSP under the white.


I hope you enjoyed my card for today!

Thanks so much for stopping by!

Please let me know if you gave this technique a try!  I would love to hear all about it!


Shop my online store.

Products used: