Tuesday, June 28, 2022

Global Design Project #GDP349 Color Challenge

 It's that time again.  Time for another Global Design Project Challenge.
This week is a Color Challenge.  How fun are these colors?  I couldn't wait to play along!


Here's the card I created using the above colors.

Daffodil Delight was used as my card base.  The next layer is Parakeet Party Glimmer Paper which was die cut with the Stitched With Whimsy dies to give the cardstock a pretty border, which doesn't show well in the photo above, but shows better in the photo below.  I used a strip of Tahitian Tide Glimmer paper as the base behind the flowers.

The sentiment was stamped with Tahitian Tide, one of the NEW In Colors.  I used the Floral Gallery Dies to die cut the sentiment.  Daffodil Delight ribbon was tied in a bow and added just below the flowers.

The flower images were stamped with the three colors for the challenge.  The leaves were cut apart, because I didn't want to use the stems, adhered together by two's and tucked under the flowers, with mini dimensionals at the top of the leaves for dimension.

The background Parakeet Party Glimmer Paper was adhered with dimensionals as well as the single Parakeet Party flower image and the sentiment.  The card was finished off by adding Iridescent Pearls.

Inside the card is the 2022-2024 In Color Designer Series Paper and layered with Basic White Cardstock with a stamped image in the lower corner.


Thanks for stopping by my blog today!
I hope I've inspired you in some way.


If you would like to become a Stampin' Up! demonstrator and join my team, check out all the information here.

Shop my online store 24/7 from the convenience of your own home.


Products used for my card:


Monday, June 27, 2022

The Paper Players Sketch Challenge PP597

Hello Monday!

Time for another fun challenge at The Paper Players!  This week is a sketch from Joanne.


I love sketches, so I had to play along!
I used the beautiful Sun Prints Designer Series Paper from Stampin' Up! along with the Begin With a Dream stamp set.

I decided on a slimline card and used several layers and using Powder Pink and Night of Navy inks.


I doubled up the baker's twine and created a bow above the sentiment.
Dimensionals were used behind the sentiment and the card was finished off by adding Iridescent Pearls.

The inside of the card has two more layers with a heart added in the lower corner.

Card Measurements:
Card Base: 8 1/2 x 7, scored at 3 1/2
Card Front: 
DSP - 3 1/4 x 8 1/4
DSP Layer - 3 x 8
DSP Strip - 8 x 2
Inside Card:
DSP - 3 1/4 x 8 1/4
Basic White - 3 x 8

Be sure to check out The Paper Players challenge weekly and sign up to receive their newsletters to keep up with all the fun!

Thanks for stopping by my blog today!
I hope I've inspired you in some way to create a card and mail a card!


Products used for today's card: 


Thursday, June 23, 2022

Global Design Project #GDP348

I've been looking at the projects each week from Global Design Project and I finally decided to give this a try.  This week is CASE (copy and selectively edit) the Designer - Krista Fratttin.

Here's Krista's card to CASE:

This is what I created sticking as much to the design as I could while using the Hippest Hippos stamps & dies from Stampin' Up!

I used Daffodil Delight cardstock as my card base and Blackberry Bliss cardstock.  The beautiful DSP is Design a Daydream.  I used Stylish Shapes Dies for the center square and for the sentiment.  Linen thread was gathered behind the cute little hippo.  Stampin' Blends I used: Pink Pirouette Lt & Dk, Just Jade Lt, Gray Granite Lt & Dk, Blackberry Bliss Dk and Daffodil Delight Lt & Dk.  The image and sentiment were stamped with Memento Ink.  The square behind the hippo and sentiment were adhered with dimensionals.  I also used dimensionals behind the hippo.

I hope you enjoyed my project for today.

Be sure to sign up for emails to receive the Global Design Project each week.

Thanks for stopping by today!


Heavenly Hollyhocks Stamps & Dies

 I have a fun, bright-colored card to share with you today.

I used the Heavenly Hollyhocks Stamps and Dies along with a couple of the new In Colors from Stampin' Up!  The Designer Series Paper is called Rings of Love and is available to purchase on July 1st.  This is beautiful DSP that I know you will love!

I started with masking the Parakeet Party cardstock using Parakeet Party ink and a blending brush.  I didn't mask the whole card as I wanted to leave some of the cardstock plain.

The leaves were stamped then die cut.


These fun flowers are so bright and pretty!  Love the combo of colors too!  They were adhered to the card with dimensionals.

The card was finished by adding the Iridescent Pearls Basic Jewels.

I decided to make the inside of the card match the front by adding a die cut flower and using the Parakeet Party cardstock, die cutting the leaves.


The envelope flap is all prettied up the the Rings of Love DSP (available for purchase on July 1st).

Card Measurements:
Card Base: 4 1/4 x 11, score at 5 1/2
Card Front:
Cardstock layer: 5 1/4 x 4
Cardstock Strip: 2 x 5
DSP layer: 1 3/4 x 4 3/4
Inside Card:
DSP: 5 1/4 x 4
Cardstock: 5 x 3 3/4

Thanks for stopping by my blog today!
I hope I've inspired you in some way!


Shop my online store 24/7, from the convenience of your own home!

Join my team and become a Stampin' Up! demonstrator now!


Products used for today's card:


Friday, June 17, 2022

Tea Boutique & Wildflower Path Birthday Card

 Friday is upon us again and another weekend to enjoy!

I'm sharing a simple Birthday card today, using the Tea Boutique Designer Series Paper and Wildflower Path stamp set.

The Wildflower Path stamp images are so fun with so many possibilities!
I chose to add tall flowers with colorful flowers and grass along the bottom.  Linen thread was wrapped around the bottom of the card several times and tied in a bow.

I stamped off once for a lighter image on the envelope flap.

Here's a closer look at all the pretty flowers!

I die cut the banner with Garden Green cardstock and Basic White cardstock with the sentiment stamped in one of the NEW Stampin' Up! colors.

With the leftover strip of Tea Boutique DSP, I used a border die to create a fun border for the inside of my card.

Card Measurements:
Card Front - DSP 5 1/4 x 4
Cardstock layer - 4 7/8 x 3 5/8
Basic White - 4 3/4 x 3 1/2

Inside card:
Basic White - 5 1/4 x 4
DSP strip

I hope you enjoyed my card and that it inspired you in some way.


Join the wonderful family of Stampin' Up! and become a demonstrator now!


Products used for today's card:

Wednesday, June 15, 2022

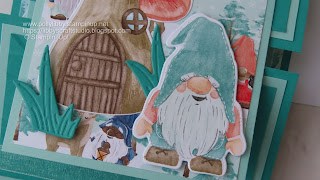
Storybook Gnomes Fun Fold

 I hope everyone is having a fantastic day!

I'm excited to share this fun fold card with you today.  I received part of my pre-order from Stampin' Up! which includes the Storybook Gnomes Suite!  Oh my... I was super stoked to get these fun products!
I wasn't always excited about Gnomes.  I really didn't care for them at first.  But then I made my very own Christmas Gnome and I fell in love with them!  So, naturally when I saw that Stampin' Up! had this Product Suite, I HAD to have it!

This is just ONE of the perks of becoming a demonstrator... we get to shop for products early.
Don't worry, beginning July 1st, you will be able to order these fabulous products plus LOTS more!

Become a demonstrator (and join my team) and have fun ordering products before they become available to everyone else.
See all the info about becoming a demonstrator here.

Now for today's fun fold!

Oh my goodness!  I absolutely LOVE this suite!  And this fun fold was super fun mainly because of the fabulous Designer Series Paper, Dies and Stamps!

The card base is Bermuda Bay and I also used another cardstock in Pool Party.  The sentiment is from Waves of Inspiration Stamp set.

The Gnome and Gnome home were cut from Designer Series Paper!  That's right, the dies fit the images on the papers!  I was so excited because I didn't need to color the images, they were already beautiful... more beautiful than if I had colored them!  The Gnome was adhered with dimensionals.

The card opens to reveal a lower flap and the sentiment inside.
You can see that the grass was adhered with dimensionals too.

I used the Cascading Ruffles 3D Embossing Folder on the upper and lower panels of Bermuda Bay cardstock and wrapped Pool Party Sheer Ribbon around each panel.

The inside of the card is Designer Series Paper and Pool Party cardstock.  I stamped one of the Gnome images in the lower corner and using the stamp from the Waves of Inspiration, stamped the sentiment.

Here's the card with the bottom flap opened up.

The card really doesn't stand up very well on it's own, but I wanted to give you an idea how it was made and opened up.

I had to show you close ups of this cute little Gnome!  He's the cutest!

I snipped a banner on one end of the sentiment strip.

This is probably a better image of how the card opens up.  Of course, I had to stamp a Gnome image onto the envelope!

Here's what the card looks like when the front flap is opened up.

Card Recipe:

Card base - 11 x 4 1/4, scored at 2 3/4 & 8 1/4
Cardstock layer #1 - 4 x 2 1/2, cut 2
Cardstock layer #2 - 2 3/4 x 2 1/4, cut 2

Top Panel:

Cardstock - 3 1/4 x 4 1/4
DSP - 4 x 3

Inside Card:

DSP - 5 1/4 x 4
Cardstock - 5 x 3 3/4

I hope you enjoyed my fun fold card for today.
Add the Storybook Gnomes Suite on your list and shop with me!


Shop my Stampin' Up! online store 24/7 from the convenience of your own home!
If your order totals $50 or more you will receive a FREE gift from me along with a handmade card.


Love card kits?  Paper Pumpkin is the card kit for you.  A cute little box delivered right to your door every month with everything you need to create beautiful cards.

The next Paper Pumpkin Kit:


Products used for today's fun fold:

Monday, June 13, 2022

Butterfly Kisses & Good Vibes

 Hello and happy Monday!

It's going to be a hot one here in North Carolina!  But when I hear of the extreme temps in other states, I'm grateful we're not quite there... yet!
I did manage to get out there and get in my walk early this morning and now it's time to just enjoy the cooler temps inside!

Today, I'm sharing a card created with the Butterfly Kisses Suite.  The Suite includes the Best Butterflies stamps, Build a Butterfly Dies, Butterfly Kisses Designer Series Paper and Fun Flowers Resin Shapes.  For more information on these products, the supply list is below.

This is such a bright and colorful card... full of fun "vibes!"

This vibrant striped paper was used on the envelope flap too.  It will be pretty hard to miss this card!

The butterfly was stamped then die cut and adhered with dimensionals.


Fresh Freesia ribbon was wrapped around the card and tied in a bow.  Fresh Freesia ink was also used to stamp the sentiment.

The inside of the card has a strip of Fresh Freesia cardstock, layered with a strip of DSP.
And another die cut butterfly was added inside the card as well.

The card was finished off with the resin flowers.  They're so pretty and match perfectly with any card you decide to make.

Card Measurements:
Card Base - 5 1/2 x 4 1/4
DSP - 5 1/4 x 4
DSP Strip - 5 1/2 x 2 1/2
Cardstock mat - 2 3/4 x 4
DSP - 2 1/2 x 2 1/2
Inside card:
Basic White - 5 1/4 x 4
Cardstock strip - 5 1/4 x 3/4
DSP strip - 5 1/4 x 1/2

Enjoy today's FREE tutorial.

Thanks so much for stopping by today!
I hope you enjoyed my Butterfly Card and that it inspires you in some way to make a card and send a card!


Use the June Host Code QG49HZJF if your order totals $50 - $149 and receive a FREE gift from me along with a handmade card.  If your order totals more than $150 then do not use the host code as you will receive Stampin' Up! rewards.

Shop Paper Pumpkin subscription.

Want to become a Stampin' Up! demonstrator?  Get all the info here.